Before you start
New to campaigns? Start with Getting started with Campaigns.
Customer Portal v3 only: Campaigns are built for Customer Portal v3 (CPv3).
Quick action links: To have a campaign open a quick action link, create the link first in Skio Dashboard > Grow > Quick Actions.
Segments: To target a segment, create it first in Skio Dashboard > Tools > Segments. Dynamic segments refresh once a day, around midnight. Learn more in our Segments guide.
Image specs: Images are optional. If you add them, upload both a desktop image (1200 × 300, 4:1) and a mobile image (750 × 400, 15:8). Use SVG, PNG, JPG, or GIF, up to 2MB each.
How do I set up a campaign?
Create the campaign on the Campaigns page, then place it in your portal in Customization. A campaign stays a draft until it's placed and published.
Step 1: Navigate to Campaigns
In the left-hand menu of your Skio Dashboard, go to Grow > Campaigns.
Click New campaign.
Step 2: Name your campaign
Click the pencil icon next to Untitled campaign and enter a name. The name is internal only. Subscribers never see it.
Step 3: Add your content
On the Content tab, add what subscribers see in the portal.
Enter a Headline, such as
25% off your next order.Optionally, enter Body copy.
Enter a CTA label for the button, such as
Claim 25% off. This is button text only. It doesn't change what the button does.Choose a Goal. It fills in automatically based on your action, and you can change it. The goal is only used to filter and compare results.
Optionally, upload a Desktop image and a Mobile image. If you add one, you need both. Without images, the banner shows text only.
You can personalize the headline, body copy, and CTA label with variables that fill in from each subscription, such as the customer's first name, next order date, or product title. Use Campaign end date only with a fixed-dates schedule.
Floating banners don't show images. If you plan to render the campaign as a floating banner, focus on the headline and body copy.
Step 4: Set the schedule
On the Schedule tab, choose when the campaign shows.
Always on: The campaign shows until you end it or remove it from the layout.
Fixed dates: The campaign shows between one start and end date and time, shared by everyone. Times use your store's timezone, and the campaign stops showing automatically at the end time.
Relative to billing date: The campaign shows a set number of Days before billing for each subscription's own next order. Each subscription rotates in and out on its own schedule.
For fixed dates, turn on Show when it ends to display the end on the banner. Choose Show the end date or Show a countdown, and optionally add a Label, such as Offer ends. For the end date, pick a Date format.
Relative to billing date doesn't apply to cancelled or failed subscriptions, since they don't have a next order date.
Step 5: Choose your audience
On the Audience tab, choose which subscriptions see the campaign.
Everyone: All subscriptions see the campaign.
Conditions: Click Add condition to target subscriptions that match up to three conditions: Subscription status, Order number, Total quantity, Subscription created, Contains products, Shipping interval, or Customer tag.
Segment: Search for and pick an existing segment.
For conditions and segments, the tab shows how many subscriptions match today. If none match, you're asked to confirm before saving.
Step 6: Set the action
On the Action tab, choose what happens when a subscriber clicks the button. Under When clicked, select one of the following.
Run an in-portal action: The subscriber confirms in the portal and never leaves it. Choose an In-portal action and fill in its settings.
Open a quick action link: Pick an existing link from Quick action link. The subscriber confirms on the landing page in a new tab.
In-portal actions and their settings:
Skip next order and Get it now: No extra settings.
Delay next order: No extra settings. The subscriber chooses to delay by 7 or 14 days, within your store's limit on how far ahead the next order can be.
Add product: Pick a variant and quantity. Optionally set a price override or percentage off, add it as a one-time item, and limit it to once per customer.
Apply discount: Enter a title and choose a discount code, fixed amount, or percentage. Optionally set how many orders it applies to. Leave it blank to apply to every order.
Change interval: Set the new interval, such as every 2 months.
In-portal actions only work on active subscriptions with a next order date, and they follow your portal action settings. Change interval isn't available for prepaid subscriptions. Subscriptions that don't qualify don't see the campaign. To reach paused or cancelled subscriptions, use a quick action link, such as unpause or reactivate.
Step 7: Create the campaign
Use the preview to check how the campaign looks on desktop and mobile, then click Create campaign. The campaign is saved as a draft.
Step 8: Place it in your portal
Placing the campaign in your portal layout makes it live. You can start from the Place in Customization link that appears after you create the campaign.
In the left-hand menu of your Skio Dashboard, go to Storefront > Customization.
On the Blocks tab, click Add block. Under Saved, click + next to your campaign.
Open the campaign block and click Edit campaign. Under Render as, choose Banner or Floating banner.
For a Banner, drag the block in the list to where you want it in the portal.
Click Publish.
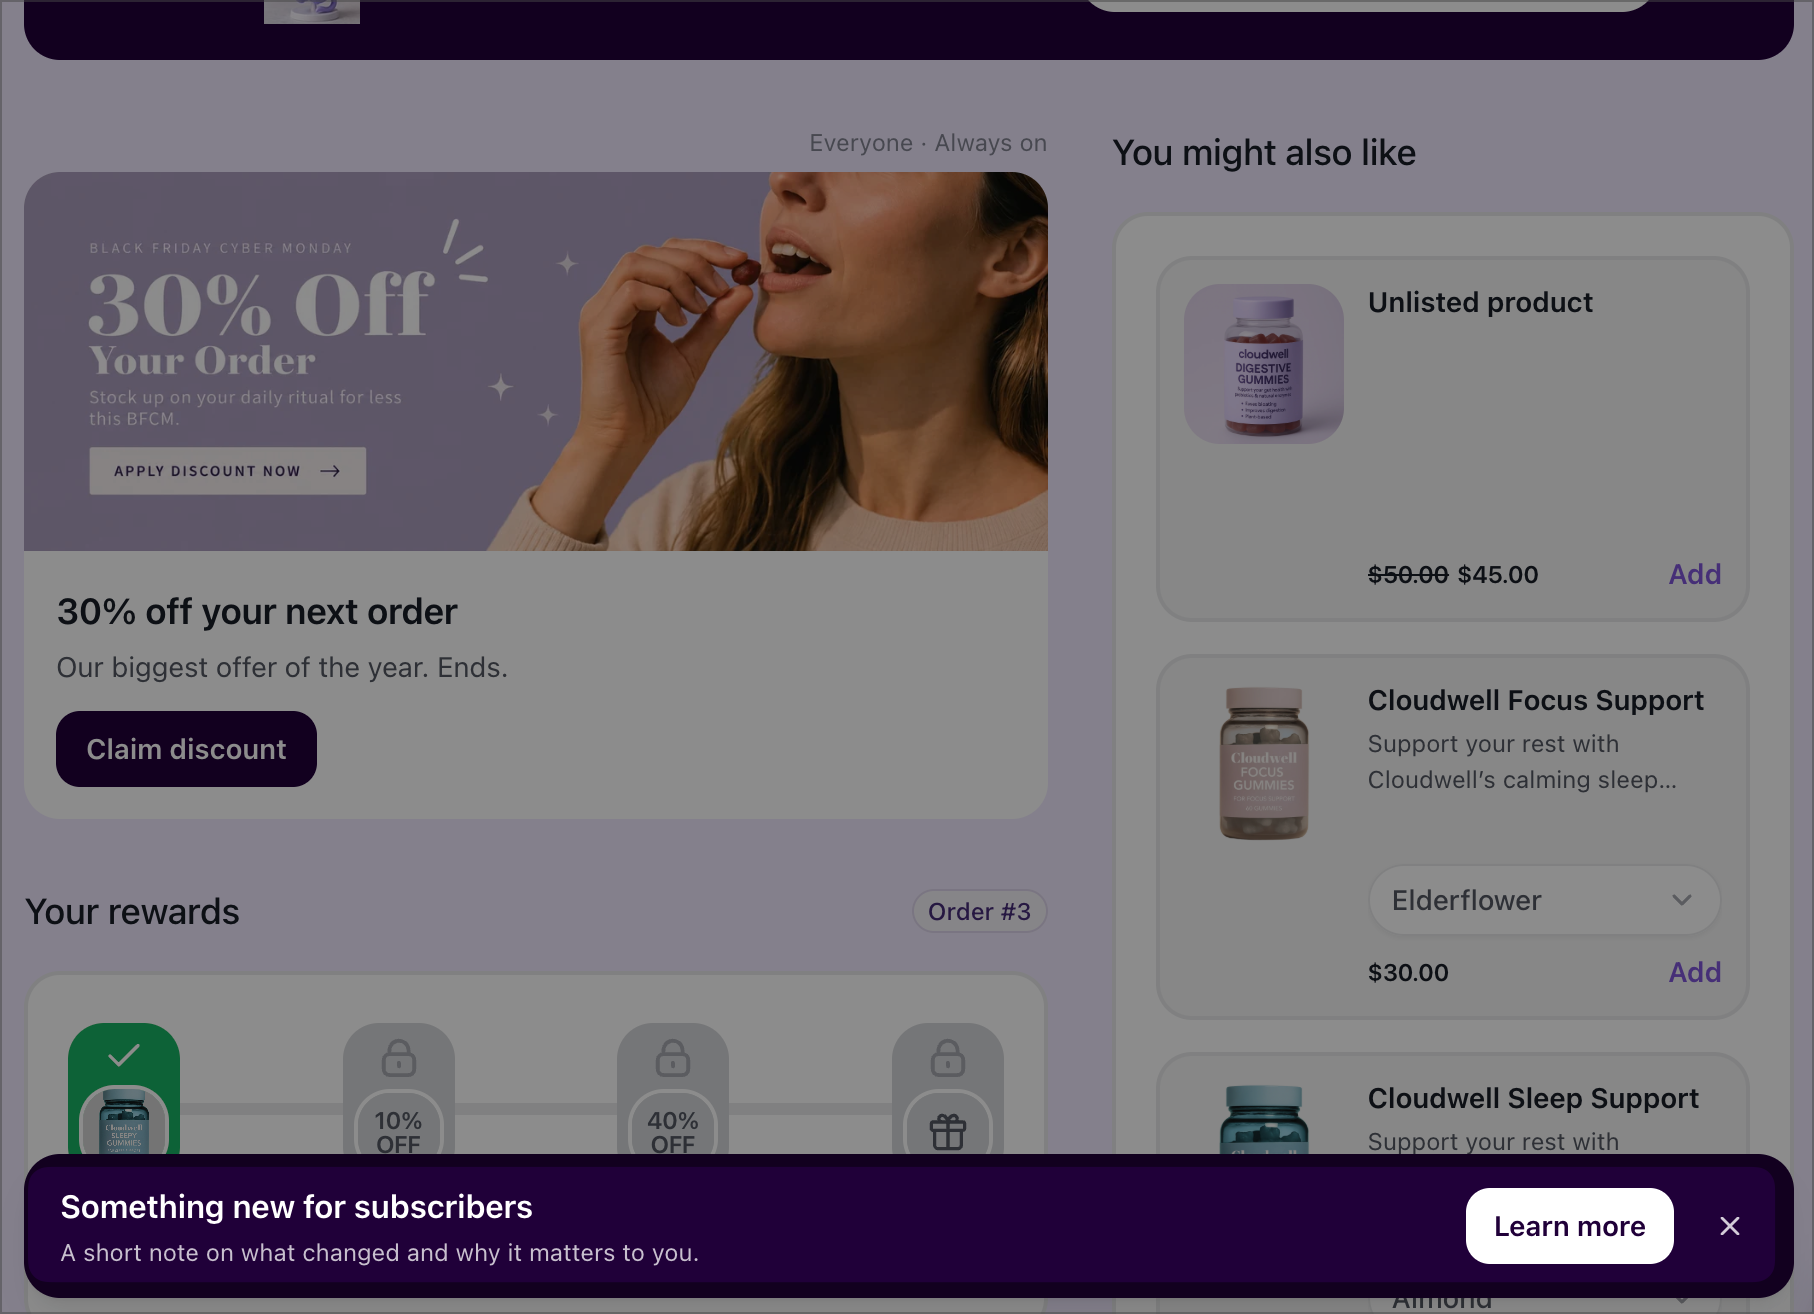
Floating banners are pinned to the bottom of the screen and always include a dismiss button. Use After a dismissal to keep the banner hidden for that subscription, or show it again after 7, 30, or 90 days.
Only one floating banner can be placed at a time. To place a new one, remove the current floating banner from the layout first.
FAQ
Why is my campaign still a draft?
A campaign stays a draft until it's placed in your portal layout and you click Publish in Storefront > Customization.
Do I need to publish again after editing a live campaign?
No. Changes to content, schedule, audience, action, and render type go live when you save. You only need to publish when you place, move, or remove a campaign in the layout.
Why can't I save a campaign with an in-portal action?
Your audience likely targets paused, cancelled, or failed subscriptions with a Subscription status condition. In-portal actions need active subscriptions, so switch to a quick action link or change the condition.